The problem
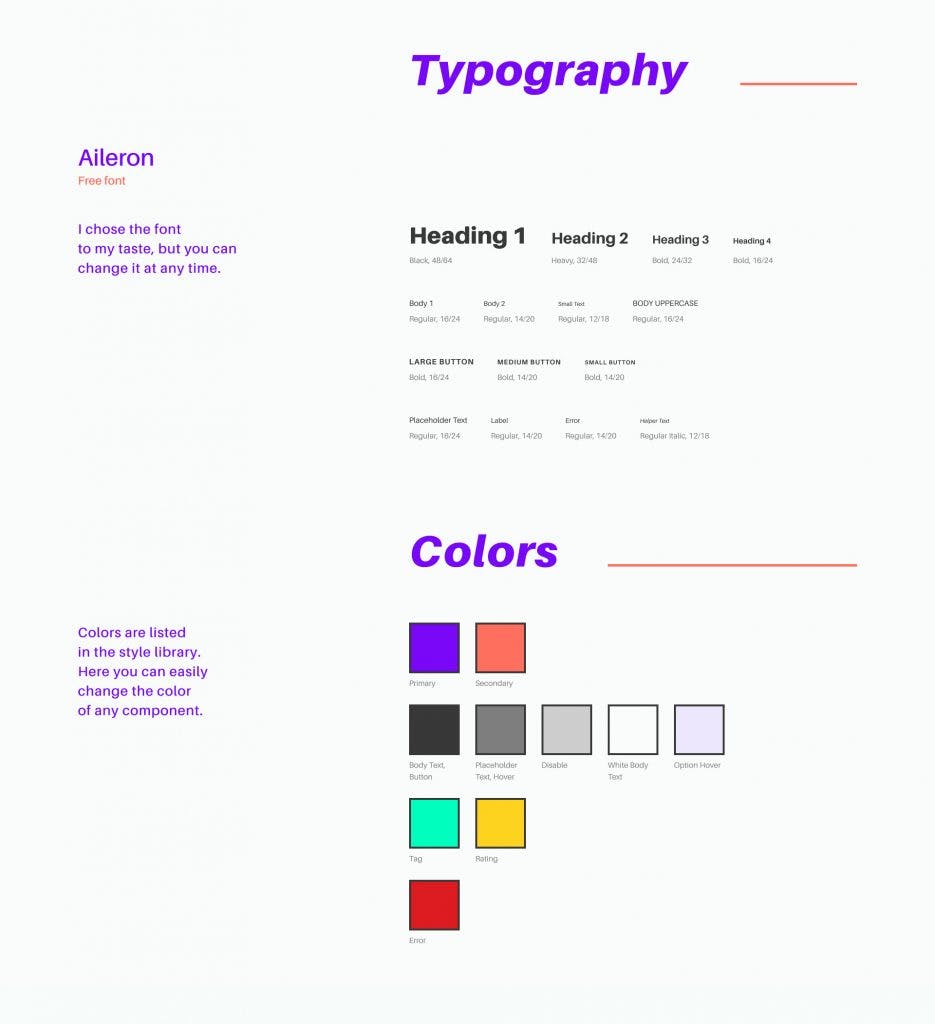
Most mobile developers often face a challenge when it comes to implementing colors, fonts and the specific styling of a predefined design. Normally UI/UX designer define exact font templates and then apply those throughout the whole app. Therefor we need a way to define templates and apply them to text elements.
Here is an example of a UI/UX font templates:
The solution
In today's blog post I am going to cover how you can implement a font template mechanism in SwiftUI so styling text within your app becomes easy
Colors
Let us start with the colors. When it comes to colors it is up to you how you implement it. Some tend to create a custom struct with static variables and other like to create an extension on the SwiftUI Color struct.
In our case we’ll be using the latter.
extension Color {
    static let Primary = Color(Color.Key.primary.rawValue)
    static let Secondary = Color(Color.Key.secondary.rawValue)
    static let Background = Color(Color.Key.background.rawValue)
    static let Error = Color(Color.Key.error.rawValue)

    enum Key: String {
        case primary = "Primary"
        case secondary = "Secondary"
        case background = "Background"
        case error  = "Error"
    }
}
Fonts
In order to load custom fonts we need to copy the specific font (in our case a .otf extension) into the project.
In Xcode you then need to reference the font in the Info.plist file (for further information please look at the Apple Developer page)
Now we’re going to create a enum to be refactoring safe:
enum AppFont {
    case sfProText = "SF-Pro-Text"
    case sfProTextMedium = "SF-Pro-Text-Medium"
    case sfProTextBold = "SF-Pro-Text-Bold"
}
Please keep in mind the font file needs to match the name you are specifying here.
Font template
Now that we have successfully loaded the colors as well as the fonts, we can start creating our font template.
public class FontTemplate {

    private var id: UUID
    public var font: Font
    public var weight: Font.Weight
    public var foregroundColor: Color
    public var italic: Bool
    public var lineSpacing: CGFloat

    public init(font: Font,
                weight: Font.Weight,
                foregroundColor: Color,
                italic: Bool = false,
                lineSpacing: CGFloat = 10.0) {
        self.id = UUID()
        self.font = font
        self.weight = weight
        self.foregroundColor = foregroundColor
        self.italic = italic
        self.lineSpacing = lineSpacing
    }
}
After creating the FontTemplate struct we are now able to create a FontTemplateModifier which is going to apply the font from the model to the view.
struct FontTemplateModifier: ViewModifier {

    let template: FontTemplate

    init(template: FontTemplate) {
        self.template = template
    }

    func body(content: Content) -> some View {
        content
            .font(template.font
                    .weight(template.weight)
                    .italic(template.italic))
            .lineSpacing(template.lineSpacing)
            .foregroundColor(template.foregroundColor)
    }
}

extension Font {
    public func italic(_ value: Bool) -> Font {
        return value ? self.italic() : self
    }
}
Notice that I also created a Font extension with a helper function so we can easily apply our italic styling.
Now it is time to create a helper function which is going to be called on any given view to apply our newly created modifier. We can do so by creation an View extension.
extension View {
    public func fontTemplate(_ template: FontTemplate) -> some View {
        modifier(FontTemplateModifier(template: template))
    }
}
Integration
We have no created all the boiler plate we need. Now it is time to implement our first custom template.
We just need to create a model where our templates are stored:
struct AppFontTemplate {

    static let title = FontTemplate(font: Font.custom(AppFont.sfProText, size: 18.0),
                                    weight: .bold,
                                    foregroundColor: .black)
    static let heading = FontTemplate(font: Font.custom(AppFont.sfProText, size: 16.0),
                                      weight: .medium,
                                      foregroundColor: .black)
    static let body = FontTemplate(font: Font.custom(AppFont.sfProText, size: 12.0),
                                   weight: .regular,
                                   foregroundColor: .black)
}
After doing so we now can use the created FontTemplates:
Text("Hello World")
    .fontTemplate(.title)
When you now check the preview or launch the app you are going to see your Hello World fully styled with your predefined template.
Here we go! Applying text styles in your app is now easy 🎉
Example code: github.com/jakob-fiegerl/SwiftyTheme
So, let's recap!
- SwiftUI has no native way for font templates
- Creating our model structs as well as some extension helps us solve this problem
- Template usage is easy by just calling the
fontTemplatefunction 💡
Like this article?
Make sure to follow me on social media.
➕ Twitter: _jakeio


